


Dining Room Lighting Rules Every Home Should Follow
Lighting transforms the dining room from a functional eating space into an atmosphere where memorable moments happen. The difference between a dining room that feels warm and welcoming versus cold and institutional often comes down to lighting choices. While it might seem tempting to rely on a single overhead fixture, the most sophisticated dining rooms employ layered lighting strategies that provide flexibility, visual interest, and the ability to adjust ambiance based on the occasion. This comprehensive guide reveals the lighting rules that professional designers follow, helping you create a dining room where every meal feels special and every gathering glows with intention.
The Foundation: Understanding Layered Lighting
Layered lighting—the combination of multiple light sources at different heights and intensities—creates the most beautiful and functional dining environments. Rather than relying on a single overhead light that casts harsh shadows and can feel institutional, layered lighting builds warmth and sophistication through carefully orchestrated fixtures.
Three Layers of Lighting: The professional approach to dining room lighting incorporates three distinct layers, each serving a specific purpose.
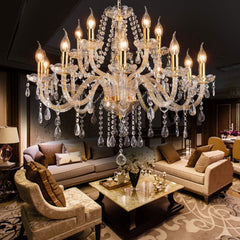
Ambient Lighting: This is your baseline illumination, providing overall light throughout the dining room. Your chandelier or main overhead fixture serves this purpose. Ambient lighting should be sufficient for basic dining and entertaining but not so bright that it feels institutional. The goal is inviting, not interrogatory.
Task Lighting: Task lighting illuminates the table itself, allowing diners to see their food and table settings clearly. While the chandelier contributes to this, additional lighting—such as wall sconces on either side of a buffet or artwork above a sideboard—provides focused illumination exactly where it's needed.
Accent Lighting: This decorative layer highlights architectural features, artwork, or creates visual interest. A picture light above a painting, uplighting on crown molding, or a lighted display cabinet adds sophistication and draws the eye to beautiful elements. Accent lighting separates a merely functional room from a thoughtfully designed space.
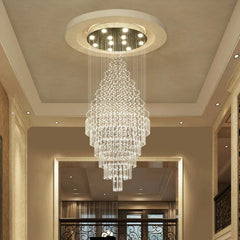
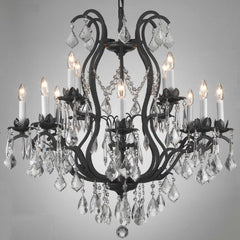
Chandelier Placement and Positioning
Your dining room chandelier is typically the most prominent light fixture and often the focal point of the room. Proper placement and height are essential for both aesthetics and function.
Horizontal Placement: Center your chandelier directly above the dining table. This might seem obvious, but in rooms with multiple focal points or off-center tables, it's easy to miscalculate. Measure your table carefully and position the chandelier's center directly above the table's center.
Height Specifications: The bottom of your chandelier should hang 12-15 inches above seated eye level. For a standard 36-inch dining table with typical seating height, this means hanging the chandelier 30-36 inches above the table surface. This positioning provides light without blocking sightlines across the table, allowing diners to see each other comfortably.
Adjusting for Ceiling Height: If you have a 9-foot ceiling, follow the standard 30-36 inches above the table measurement. However, rooms with 10-foot or higher ceilings can accommodate slightly lower chandeliers (within reason) without creating sightline issues. Conversely, rooms with 8-foot ceilings may require a slightly higher placement to avoid a cramped feeling.
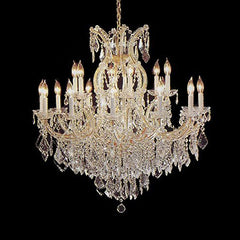
Table Size and Chandelier Scale: Your chandelier should be proportional to your table. Using the same formula from our crystal chandelier guide—adding the room's length and width in feet and converting to inches—ensures your chandelier is appropriately scaled. As a rule of thumb, your chandelier diameter should be 1/2 to 2/3 of your table's width.
Wall Sconces and Supplemental Lighting
Wall sconces flanking a mirror, artwork, or buffet add warmth, create visual balance, and provide essential supplemental lighting. These fixtures elevate your dining room from chandelier-only to professionally designed.
Sconce Placement Heights: Wall sconces should be mounted 60-66 inches from the floor (from floor to the sconce's center). This places them at eye level for standing viewers while providing flattering light across artwork or architectural features. Consistency is important—if you're mounting sconces on opposite walls or flanking a mirror, ensure they're at the same height.
Spacing and Balance: Sconces flanking a mirror should be positioned 24-36 inches from the mirror's center on each side, creating visual balance. If mounting sconces on a buffet or sideboard, position them to illuminate surfaces and artwork without creating harsh shadows.
Buffet and Sideboard Lighting: A picture light above artwork or a low-voltage halogen accent light above your buffet adds dimensionality. These focused lights prevent dark corners and create visual interest that a chandelier alone cannot achieve.
The Dimmer Switch: Your Most Important Control
A dimmer switch is non-negotiable in a well-designed dining room. This single installation elevates your lighting from static to flexible, allowing you to adjust ambiance for different occasions and moods.
Why Dimmers Are Essential: Bright light at lunch feels appropriate; the same brightness at a romantic dinner feels harsh. A dimmer allows you to set your chandelier and overhead lighting at different levels depending on activity. Dimmed lighting (typically 50-75% capacity) creates warmth and intimacy. Brighter settings work for entertaining and formal gatherings.
Dimmer Compatibility: Not all fixtures are dimmer-compatible. When selecting your chandelier, verify that it works with standard dimmers. Most LED chandeliers are dimmer-compatible, but older incandescent fixtures and some budget LED options may not be. This is a critical specification to confirm before purchasing.
Dimmer Quality Matters: A quality dimmer switch provides smooth, flicker-free dimming across the full range. Budget dimmers may flicker or not dim smoothly. In a space where you're using this control regularly, investing in a quality dimmer is worthwhile.
Multi-Control Setup: Consider installing separate dimmer switches for different light layers. One dimmer controls your chandelier, another controls wall sconces. This allows you to adjust ambiance with precision—dimming the chandelier while maintaining bright sconce lighting for a buffet, for example.
Bulb Selection and Color Temperature
The type of bulb you choose dramatically affects how your dining room feels. Color temperature—measured in Kelvin (K)—determines whether light feels warm and inviting or cool and clinical.
Color Temperature Basics: Warm light (2700K) feels cozy and intimate, mimicking candlelight. Cool light (4000K or higher) feels brighter and more energetic. For dining rooms, warm light (2700K) is almost always the right choice, creating an environment where food looks appetizing and people appear flattering.
LED vs. Incandescent: Modern LED bulbs offer excellent color rendering (how accurately colors appear) and energy efficiency compared to incandescent. However, not all LED bulbs are created equal. Choose bulbs with high Color Rendering Index (CRI) ratings of 90+. This ensures that the food and faces of your guests appear natural and beautiful under the light.
Brightness Levels: Measured in lumens, brightness should be adequate for dining without being overwhelming. A chandelier providing 2,000-3,000 lumens over a dining table is typically ideal. This provides sufficient light for eating and conversation while maintaining ambiance. Pair your chandelier with dimmer capability so you can adjust brightness to your preference.
Avoiding Flicker: Cheap LED bulbs or incompatible dimmer-bulb combinations can cause flicker. This is not just annoying; it can cause headaches and eye strain. Invest in quality bulbs and ensure dimmer compatibility. Your dining room lighting should never flicker.
Creating Visual Hierarchy with Light
Professional dining rooms use light to create visual hierarchy and draw attention to important elements. This doesn't mean complicated installations—strategic lighting creates sophisticated effects.
Highlighting Architectural Features: Crown molding, wainscoting, or a coffered ceiling becomes beautiful architectural interest when subtly illuminated. Install uplighting or cove lighting to wash these features with light, adding depth and dimension to the room.
Illuminating Artwork: A picture light above significant artwork adds elegance and draws the eye to beautiful pieces. Position the light fixture so it illuminates the artwork without creating glare or harsh shadows.
Creating Focal Points: Light naturally draws the eye. By illuminating your best architectural features while leaving other areas in comparative shadow (though never truly dark), you create visual interest and sophistication.
Specific Lighting Solutions for Different Dining Situations
Not all dining rooms are the same, and different configurations require different lighting strategies.
Open-Plan Dining Areas: In dining areas that flow into kitchens or living spaces, your lighting must clearly define the dining zone without making adjacent spaces feel dark. Use a chandelier over the table paired with wall sconces. This creates a distinct lighting zone that visually separates the dining area from adjacent spaces.
Small Dining Spaces: Smaller dining rooms benefit from a single quality chandelier paired with wall sconces or accent lighting. Avoid multiple overhead fixtures that can feel busy in limited space. Instead, focus on one beautiful central fixture and supplemental accent lighting.
Larger Formal Dining Rooms: Grand dining spaces can accommodate multiple focal points. A substantial chandelier over the table might be paired with a second smaller chandelier or pendant cluster over a sideboard or buffet. Sconces on multiple walls add warmth and prevent the expansive space from feeling cold.
Extension Tables and Variable Seating: If your dining table extends for larger gatherings, ensure your chandelier positioning works for both the table's compact and extended configurations. A chandelier centered over the table's middle point remains centered even as the table expands, maintaining proportion and balance.
Common Dining Room Lighting Mistakes to Avoid
Understanding what not to do is as important as knowing what works.
Single Overhead Fixture: Relying solely on your chandelier for illumination often feels flat and uninspired. Layered lighting with supplemental fixtures creates sophistication.
Insufficient Brightness: While ambiance matters, you should be able to see your food clearly. If your chandelier is so dim that you're reaching for a flashlight to see your plate, it's not providing adequate task lighting. Balance ambiance with functionality.
Poor Color Rendering Bulbs: Cheap LED bulbs with low CRI ratings make food look unappetizing and people look unhealthy. Invest in good bulbs.
Chandelier Too High or Too Low: Positioning errors compromise both aesthetics and function. A chandelier hung too high leaves diners feeling like they're eating in a cave. Too low, and it creates a safety hazard. Follow the guidelines provided earlier for proper height.
Mismatched Finishes: Your chandelier, wall sconces, and other fixtures should coordinate in finish (brass, chrome, brushed nickel, etc.). Mixing finishes carelessly creates visual discord.
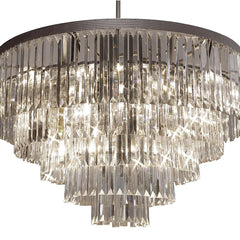
Selecting Your Dining Room Chandelier
Your chandelier is typically the most significant lighting investment in a dining room. Whether you choose crystal, traditional brass, modern chrome, or a transitional design, ensure it provides adequate light while matching your aesthetic. Explore our full chandelier collection to find a piece that elevates your dining room with both light and beauty.
Frequently Asked Questions
How low should I hang a dining room chandelier?
Your chandelier's bottom should hang 12-15 inches above seated eye level, typically 30-36 inches above a standard 36-inch dining table. This allows diners to see each other across the table without obstruction while the chandelier provides beautiful light. Adjust slightly for very high or low ceilings, but this formula works for most dining rooms.
Is a dimmer switch really necessary for a dining room chandelier?
Yes, absolutely. A dimmer switch is one of the most important investments you can make for a dining room. It allows you to adjust ambiance for different occasions—intimate dinners versus entertaining large groups. A fixed brightness level feels institutional and inflexible. Quality dimmer switches provide smooth, flicker-free dimming that enhances your dining experience.
What color temperature should I choose for dining room lighting?
Warm light at 2700K is ideal for dining rooms. This color temperature mimics candlelight, creates an inviting atmosphere, and makes food look appetizing and people appear flattering. Avoid cool white light (4000K or higher) in dining areas, as it can feel clinical and unflattering.
Can I use a chandelier with a standard dimmer, or do I need special dimmers?
Most modern chandeliers are compatible with standard dimmers, but you should verify before purchasing. LED chandeliers are typically dimmer-compatible, but confirm this in product specifications. If using older incandescent chandeliers or some budget LED models, they may require special dimmers. Always check compatibility to avoid flicker and ensure smooth dimming.


